From the Computer Vault Dept.: We’re clearing boxes of books and magazines from a room being renovated and I discovered a bunch of old computer magazines. So I’m going to share some more vintage articles of mine, this one an amusing foretaste of what we now take for granted with Skype and Zoom and many other at-our-fingertips video-chat utilities. We’re heading back, back, back ... to 1995.
TWO OF THE GREATEST DISAPPOINTMENTS of New York’s 1964 World’s Fair were the disappearance of Picture Phones and the persistence of that wretched song “It’s a Small World.” Only in the last few years have picture phones gained even a little market presence, but they’re hampered by poor picture quality and a too–high price. It’s tough packing all the required information into the cramped space afforded by a dial-up phone line, so ASL offers a compromise. How about a digital image of the person you’re talking to? Better still, how about the ability to transmit pictures and drawings?
All you have to do is avoid creating an image that changes too quickly. The MegaConference system uses a video-compression technique to reduce the amount of information going over the wire, and it counts on a fairly static scene to work efficiently.
The compression is essentially a lazy technique; it first sends a complete picture and then repaints only the parts of each successive screen that change. You can do anything you want in front of the camera, but the more information the system has to send, the longer it takes to update the picture. Your inspired break dance comes out as a sluggish slide show on the other end.
The other minor drawback is that to have simultaneous video and voice, you need two phone lines (which also means you're doubling any toll charges). If you only have one phone line, you can make do by typing your conversation in a horizontally split dialog box.
On the plus side, MegaConference includes a special drawing and painting program. You can create pictures that are instantly transmitted, or you can import and send existing images.
Despite its limitations, videoconferencing is addictive. The experience of seeing my first phone call was probably much like what the radio generation felt when television was introduced.
Data is moved by a fast modem. It transmits at 28,800 bits per second (bps), but compression utilities give it an effective speed of up to 57,600 bps. Even if you're used to a 14,400-bps modem, you'll be impressed.
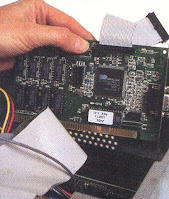
Another bonus is the Lightning II VGA card that drives the MegaMotion board. It’s based on a Cirrus Logic chip and provides video acceleration for Windows. Be aware that the connection between the Lightning II card and the MegaMotion card limits you to a 256-color display, but you can simply plug your monitor into the back of the Lightning II card for those Windows sessions when you want to see more colors and won’t be showing your face over the phone.
Once I got the hardware in and the software installed and configured, I used the new software to call Alpha Systems’ tech support line and boast of my success. “I have seen the face of tech support,” I thought, as the company’s technician and I stared at each other. How many people can say that?
Note: You may have to mess with jumpers, I’m sorry to say. Worse: there are interrupts to deal with. It’s not a problem if you don’t have a lot of other stuff in your system. The Megamotion card needs two interrupts, and the default setting setting puts the codec (the coder-decoder) at interrupt 10 and the video processor at 15. Because I have a network card in my system that uses IRQ 15, I changed that setting to 12, which was simply a matter of moving a jumper bridge from pins marked JP29 to JP27. Of course, I didn’t remember to do so until after I’d put the computer back together, and the jumper pins are located on the most inaccessible part of the card once it’s installed, so don’t be as overconfident as I was. Leave the case off your machine until you’re sure everything works.
Everything You Need for This Project
- MegaConference; $1,100 (optional camera $395) from Alpha Systems Labs; (714) 622-xxxx.
- PC (386 or faster) with Windows 3.1.
- At least 4 megabytes of RAM.
- Medium (no. 2) Phillips-head screwdriver.
- For simultaneous voice and video, two phone lines are required. For video only, one phone line is required.
- Another similarly equipped user at the other end of the phone line.
Do:
- Clear a good-size work space.
- Double-check all connections—it's easy to dislodge things like disk-drive cables.
- Get a friend to help you. (This will help persuade him or her to get a videoconferencing rig, too.)
- Consider installing a second phone line.
- Comb your hair. You're going on camera!
Don’t:
- Force a board into an expansion slot. Try a rocking motion.
- Let the cards touch one another in the computer. You can use the plastic edge guide on the back wall of your PC case to align full-size cards properly.
- Use your existing modem or video adapter.
- Forget to configure any communications software you have so it will work with the faster modem that comes with the kit
1: Install the VGA Card
Note: For videoconferencing, do not attach your monitor to the Lightning II VGA board. The monitor plugs directly into the MegaMotion board. For other applications, you can bypass the MegaMotion board by attaching the monitor directly to the Lightning 11 VGA board.
2: Install the Megamotion Board
Plug the other end of the ribbon cable into the feature connector on the MegaMotion board, then install the MegaMotion board in an adjacent expansion slot.
Make sure the ribbon cable stays fully attached to both the Lightning II VGA board and the MegaMotion board and isn't twisted.
Plug the monitor cable into the jack on the back of the MegaMotion card.
3: Install the Modem
If you already have an internal modem, remove it. Then, in a free expansion slot, install the one that comes with the MegaConference kit.
4: Install the VGA Drivers
Your DOS applications will run as before, but you will need to install new video software drivers for Windows.
At the C: \Windows prompt type SETUP. Select Change the Display Setting and press Enter. In the menu of video selections, scroll to the bottom of the list and select Other.
When prompted, place Disk 1 of the MegaConference software set (Lightning II VGA Drivers) in drive A: and press Enter. Select the 640 by 480 by 256 setting and then start Windows.
5: Install the Conferencing Software
The remaining software is installed from Windows. You'll need to select File Run A:\Setup from the Windows Program Manager.
Disk 2 installs the MegaConference program, which is used to control the video communications.
Disk 3 adds a run-time version of Video for Windows to manage the onscreen TV image.
Disk 4 includes the drivers for the MegaMotion card. Once the installation process is finished, exit from Windows and turn off your machine.
6: Hook up the Camera
The optional camera (you can also use a VCR or camcorder with the system) has a large, padded foot to allow it to rest nicely on top of a monitor. If you prefer, the camera can be secured with Velcro (a strip is included).
After placing the camera on the monitor, attach the AC adapter cord to the back of the camera and plug it into a nearby outlet. Another cord, with a four-pronged plug, also goes into the back of the camera; an identical cord attaches to the MegaMotion card. These cords carry the video information. Once you have one cord attached to each device, connect the two yellow ends using the in-line coupler supplied with the kit.
7: Adjust the Image
Turn on your computer, launch Windows, and from the MegaMotion Utilities program group, click on the DigVid icon. The first time you launch it, the DigVid utility gives you a simple gray screen with the words "Digital Video" across it. If the words are not centered, adjust the skew with the arrow keys or use the Horizontal Adjust slider bar.
8: Set up Megaconference

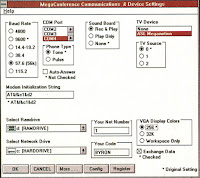
The MegaConference Windows program group contains three icons. Double-click on the one labeled Settings and fill in the basic settings information: Set the baud rate to 57.6, and make sure COM4 is highlighted and TV Device is set to ASL Megamotion. Near the bottom left corner of the screen is Select Ramdrive, which should be set to drive D: (via the pull-down menu). Select Network Drive should always read drive C:. Change the figure in the box marked Your Net Number to 1, and give yourself a name in the box labeled Your Code. Click OK.
9: Run Megaconference and Call a Friend!
MegaConference is your calling center. The first thing it does is throw an image of you on the screen, assuming you’re in front of the camera. Do a test by taking a network call from yourself. Click on the Quick Call button, which allows you to dial with a miniature numeric keypad. To call yourself, select 1, then click on the button marked Net. In a moment, you’ll see another window displaying the same image as the first. This is the sight you’ll inflict on others when you make video calls.
– Computer Life, January 1995


No comments:
Post a Comment