WEATHER INFORMATION is a valuable commodity. It’s the classic conversational icebreaker; it’s reckoned for the coming week in the general store and for the coming year in the Farmer’s Almanac. On television, it’s the only part of the news that merits two commercial breaks.
 As a youngster, I installed a Remco Weather Station outside my bedroom window. This cool-looking kit included an anemometer, a temperature gauge, and a plastic funnel for measuring rainfall.
WeatherBank’s Weather-Brief Plus Weather Station reminds me of that Remco kit (OK, its anemometer is a lot more precise), except that WeatherBrief sends its information to your computer via a six-line phone cord, and data is plotted onscreen. It’s actually a two-part kit, the other part being the software that calls the WeatherBank BBS and downloads local, domestic, and international weather info. Short of sending up weather balloons or your own satellite, this is an excellent way to read current conditions and find out what’s to come.
Your bum knee may be a good forecaster of rain, but WeatherBrief gives more specific information about wind and temperature. In fact, with the optional barometric and rainfall sensors, you can ignore that knee altogether. The software displays a real-time account of wind and temperature and calculates the windchill factor for you; it also plots a chart of averages for the past 24 hours. Meanwhile, the hourly averages are saved to an ever-expanding file on your hard disk, which you should thin out every few months with an included utility.
WeatherBank’s dial-in database is used by broadcasters, farmers, pilots—anyone whose livelihood depends on knowing what’s happening in the skies. National Weather Service readings are collected from all over the country; you can find out what’s happening all the way down to specific cities and rural zones. Radar maps are even available, as are charts of precipitation, drought, crop moisture, fire danger, and much more.
The more you know about weather theory, the more you’ll get from this device. WeatherBank helps you get started by including a short video about weather and forecasting; it sent me to the encyclopedia to learn more.
WeatherBrief collects data whenever it’s running, even when it’s running in the background. The graphical display shows current conditions and a 24-hour summary; hourly readings are saved to disk and can be read as a text file. The company also offers special hardware that acts as its own data collector; it provides enough exotic weather data to compete with professional meteorologists.
Having worked with this station for a couple of weeks, I’m developing a morbid wish for inclemency. I want to see the weather vane go crazy, the anemometer cups spin into a blur. To calm myself, I download the maps showing lightning strikes and hurricane paths and marvel at what’s happening elsewhere. I’ve never had such easy access to this much information before.
Everything You Need for This Project
- WeatherBrief Plus Weather Station (including modem software, parallel port card, and weather videotape), $395; from WeatherBank. [Note that WeatherBank has long since changed its business focus, and now provides subscription-based weather information.]
- PC with EGA (or better) display, 640K of memory, modem, and available expansion slot.
- A pole 1 inch in diameter that can be secured to your house or grounds. Note: A galvanized plumbing pipe is your sturdiest option. Figure on 10 feet of pipe for a roof mount, 20 feet or more for ground mounting.
- Mounting brackets (Radio Shack has these), pliers, socket wrench set, small flat-head screwdriver, grounding rod and aluminum ground wire, magnetic compass, extra phone cord (optional) and couplers.
- Find an area free of obstructions, such as an easily accessible rooftop, where you can mount the outdoor hardware.
- Have a friend help you install the mast.
- Keep a few reference works on clouds and weather handy.
Don’t
- Crimp the data cable in a door or around a corner.
- Strap your mast to the chimney; smoke can damage the unit’s housing.
- Assume your roof is free of wasps.
- Work outside in thunderstorms.
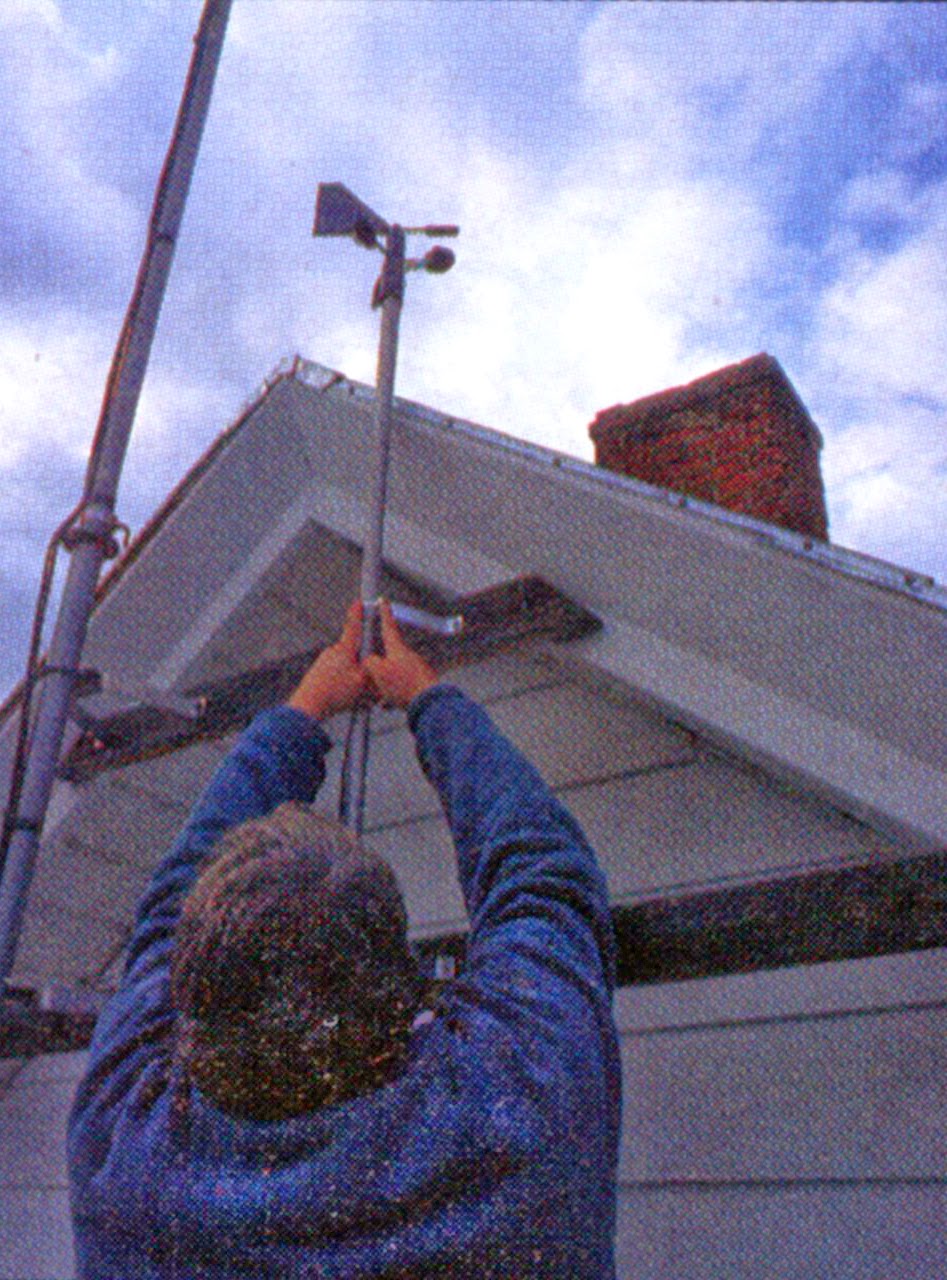 1. ATTACH THE WEATHER STATION. Use a length of 1-inch (outer diameter) galvanized pipe to mount the weather station. (In the confusing parlance of plumbers, this is three-quarter-inch because they measure it by the inner diameter.) I used a 10-feet length for a roof mount. The manual in my kit warned against using a steel mast, but the company’s tech support assured me that the weather station has since been improved to prevent problems with metal affecting the anemometer magnets. Fit the weather-station’s housing over the mast and tighten the screws.
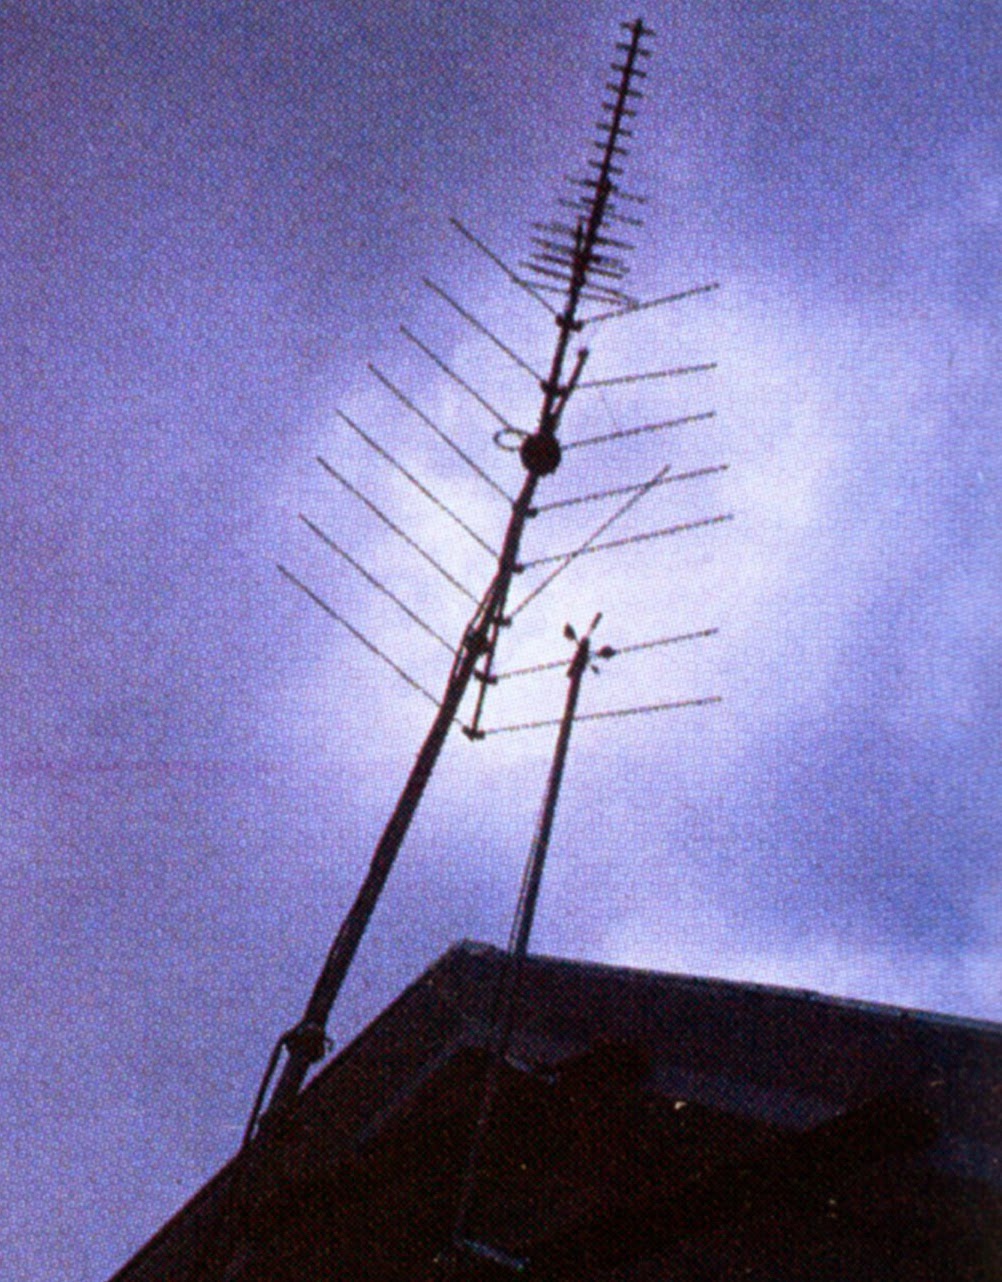
2. RAISE THE MAST. Attaching the mast is an easy job that should take less than 20 minutes, although I spent a little longer because of the ducking-the-wasps dance I did on my rooftop, which ended with one of the wasps winning. Start by getting the weather station up as high as you conveniently can. Mounting it against the roof peak was easiest for me because there’s a flat section of roof right next to my attic peak. I bolted a pair of 4-inch wall-mounting brackets to the same supports that hold my TV antenna, then placed the pipe in the brackets. I didn’t tighten the brackets at this point, because the pole must be rotated to point the weather station in the right direction.
 An alternative to the roof method is to raise a longer length of pipe in your yard. Keep in
mind that tall buildings or stands of trees can interfere with wind readings, so locate the unit away from large objects. To calculate where to place your pole, multiply the difference in height between the large object and the weather station by 2.5. For example, if your mounting pole is 20 feet tall and your house is 30 feet tall, you would use the difference of 10 feet in the formula: The result tells you to mount the mast 25 feet from the house. If the mast is very tall, anchor it to the ground with guy wires for extra support. Warning: Don’t use a chimney-mounting strap assembly for your mast, as fumes can damage the sensor housing.


 5. INSTALL THE SOFTWARE. At your computer, place the WeatherBrief disk in your floppy drive and type A:INSTALL. The program will create a directory named WB5 on your hard disk and install all the necessary files. During installation you will be prompted to choose a parallel port (see Step 6). If you’re not sure which one to use, start with LPT2. If the computer says it’s the wrong one, try another number after you complete Step 6.
Start the program by typing RUNWB. Choose Option E, Customize WeatherBrief, from the menu. From the next menu choose Modem and enter your assigned account number and password (these should be on the front of the manual) as well as your COM port and modem speed.

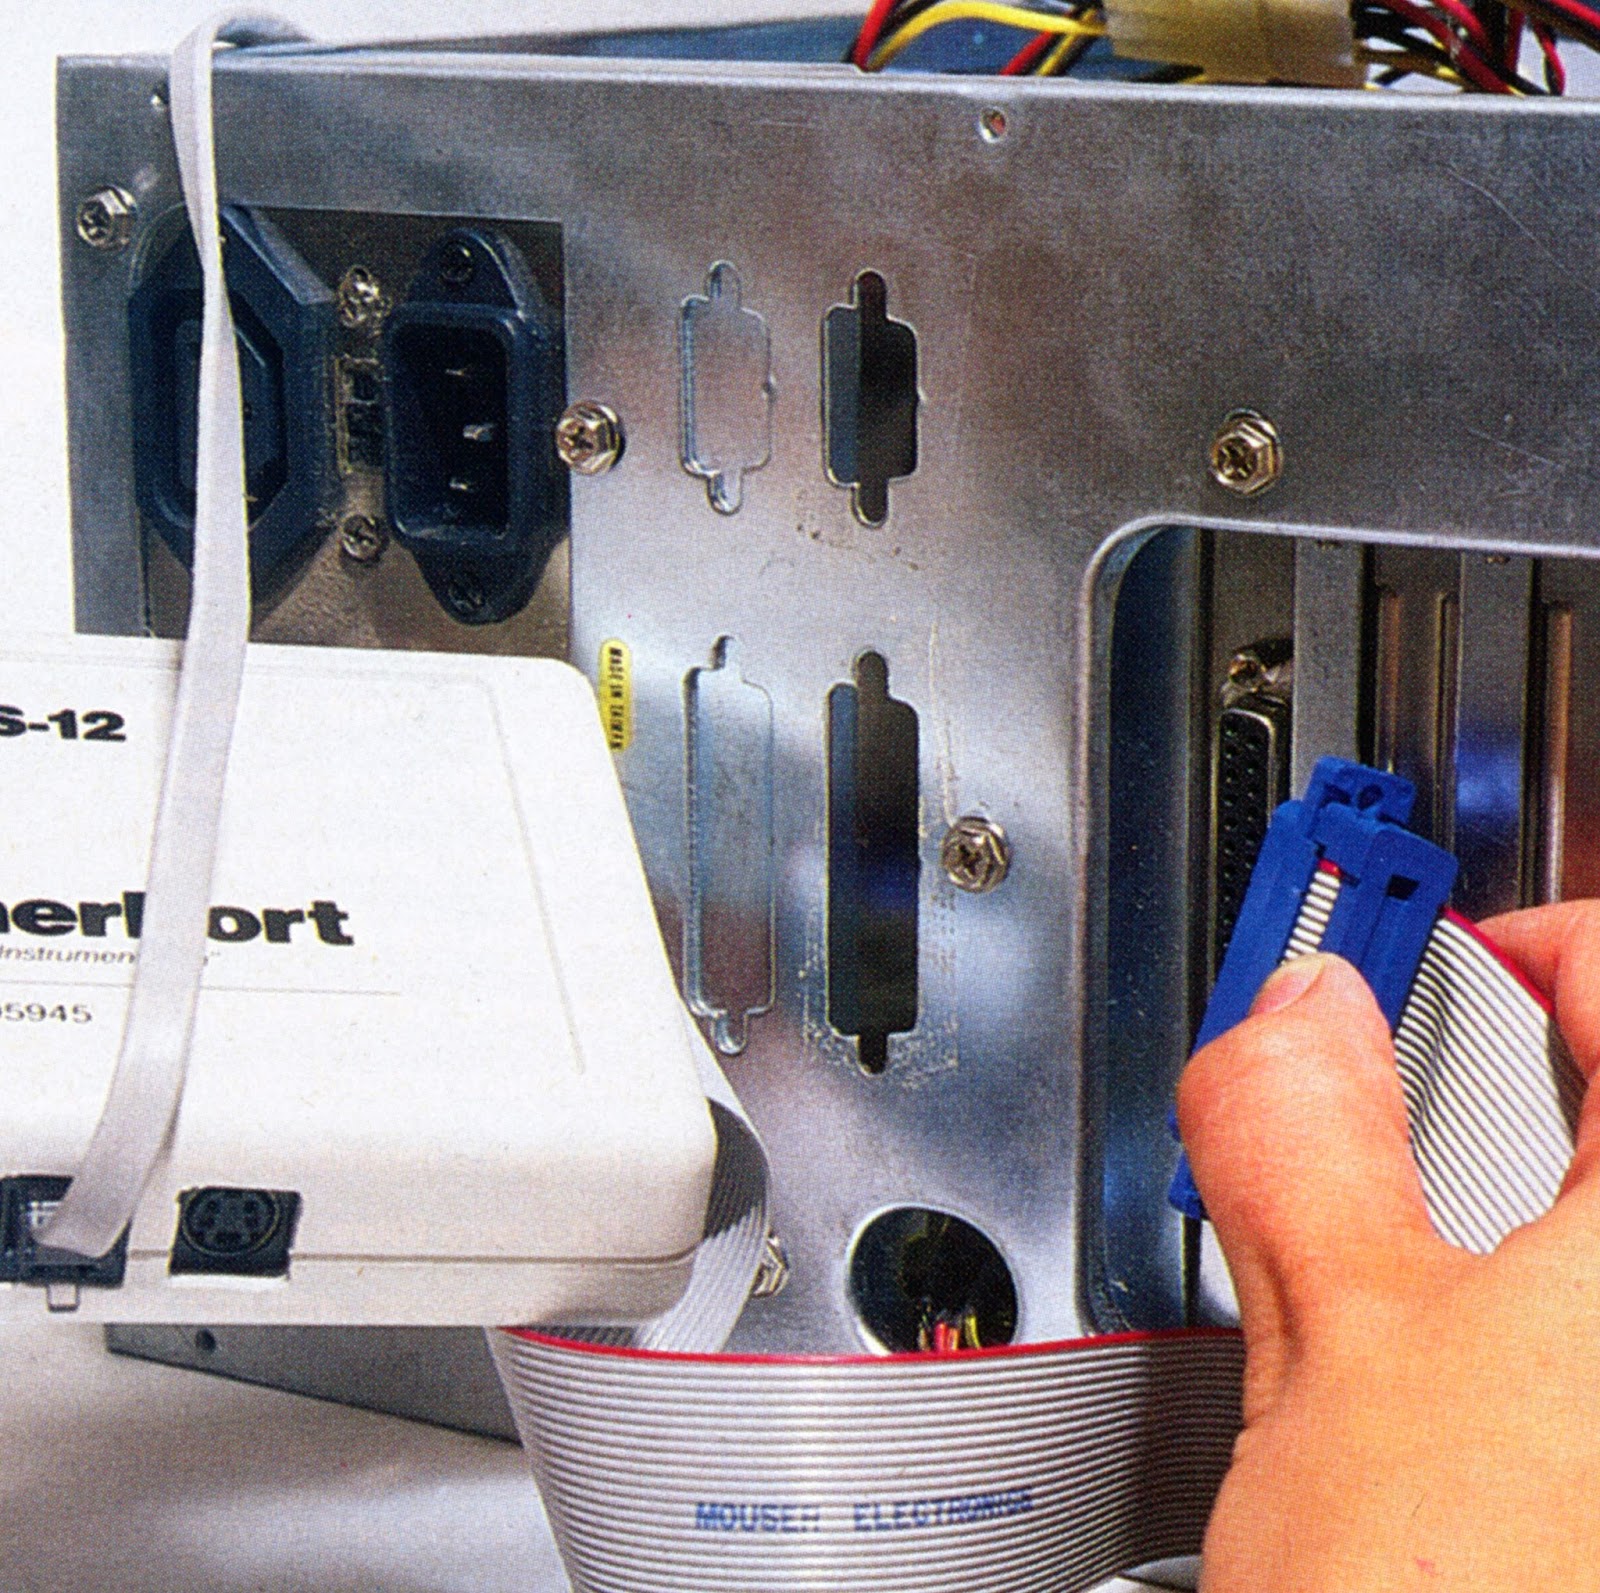 7. CONNECT THE CABLE. Information from the weather station is fed through a thin cable to a small box called the WeatherPort. A 40-foot length of the cable is included, but this was not enough to reach from my roof all the way to my office, so I bought another 50 feet from Radio Shack (it’s called RJ-12 cable and is also available from WeatherBank) as well as the couplers needed to connect the extra cable to the original one. Once the cable is within reach of your computer, plug it into the Weather-Port (this is just like plugging a phone line into a modem). The WeatherPort sports a fiat ribbon cable that plugs into either your computer’s newly installed parallel port card or an existing parallel port.


By default, the program is set to receive only a few kinds of report, although you can set it to receive more exotic information by using Option A, Maintain Selection Groups, on the main menu. From there you’ll be taken through menus that let you choose the information you plan to download in future online sessions. From interstate highway conditions to jet-stream progress to soil-temperature reports, the range of information is impressive. This is exactly what the TV meteorologists use, so you won’t have to suffer through those two commercial breaks any longer.
– Computer Life, December 1994
No comments:
Post a Comment