“IF IT’S OUT THERE, it’s in here,” a phone company ad campaign proclaims, never realizing that they also were describing my computer when it has a scanner attached. Which is to say that if there’s a useful image out there, I now can get it in here, in my computer, with very little fuss.

It wasn’t always this easy. I used to do it using a fax machine, and then only because I also have two phone lines and a fax/modem, allowing me to send images into my computer as lousy-looking fax files. And I’ve seen refrigerator art that looks better.
But that cheesy process describes what scanning is all about. You run the image through what’s essentially a color photocopy system, and the copy is translated into computer-readable language, telling it exactly how to color the pixels on the screen and what to send to a printer--especially a color printer.
With the availability of relatively inexpensive color flatbed scanners, however, nothing stands between you and good-looking computer-based images. Except for the installation procedure, and that couldn’t be more straightforward.
The Hewlett-Packard IIcx scanner is a full-color, single-pass scanner with 400 dots-per-inch resolution that’s bumped up to 1600 dpi with software enhancements. It plugs into your already-installed SCSI card, in which case you can use included software to find your card and confirm its compatibility. Otherwise, install HP’s own proprietary card. There’s nothing SCSI about the computer I plugged into, so I used the interface card that came with the machine.
One of the attractions of the SCSI system is the ability to chain a series of devices on one interface card, and the HP scanner grudgingly allows you to do this. Two SCSI jacks on the back of the machine are used for the hookup: one is for a large, 50-pin plug, the other is a 25-pin SCSI jack that looks like a serial jack. Theoretically, you can plug another SCSI device into the 25-pin port, but
Although the DeskScan software that comes with the ScanJet scanner is installed to run as a stand-alone program, it’s also called by the TWAIN driver when you’re working in a TWAIN-compliant graphics program. Which means that you can save yourself a mouse click or two by first launching your picture-editing program, then choosing Acquire from the application’s File menu.
The DeskScan interface is very straightforward. It makes a good guess at the type of original you’re scanning but lets you choose from a long list of other options. Sharp Millions of Colors, for instance, is the high-end, 24-bit color, see every blemish the way it was meant to be seen resolution; options for color photo, color or black and white halftone, and color or black and white drawing take care of different-quality originals, and some of those options also can take advantage of the sharpening technology.
While a scanner is usually thought of as a way to get a picture into your computer, it has other nifty talents. Scan a page (or more) of text and you can send it through an optical character recognition (OCR) program. There’s even an OCR program included in the ScanJet package. And those programs are great at recognizing text that’s even been skewed or muddied a little, saving lots of re-typing when you’re burdened with paper-based information.
You also can use your scanner as a photocopy machine. Again, there’s software included to facilitate the process, featuring an interface like you’d find on a modern copier. Set the number of reproductions you want from a page, position the original, and monochrome copies spit out from your printer.
Scanners used to be the extremely costly province of professional layout and design studios. No longer. The prices have come down, the technology has improved, and the installation is so painless that we all should be uniquely picturing our desktops.

Step 1: Install the Interface Card.
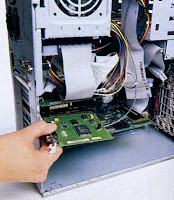
Open your computer and find an empty slot. It’s an eight-bit card, so I used one of the short slots on my motherboard. The card itself requires no jumper setting or DIP switch flipping; in fact, it’s frighteningly free of needed adjustment. Push it firmly into the slot, secure it to the case with the screw that held the case cover, and reassemble your machine. The back of the card--the part you see when the computer is assembled--should be labeled “HP ScanJet Scanner.” If it’s not, write and affix a label near the jack.
Step 2: Set Up and Connect the Scanner.
Place the scanner on a wide, accessible surface. The scanning mechanism is locked in place to protect it during shipping; find the lock--it’s in a rectangle at the upper right corner of the back of the scanner--and slide it up with your finger. (Don’t forget to lock it again whenever you move the scanner.) Plug the 25-pin end of the scanner cable into the interface card, taking care not to accidentally plug it into a parallel port--look for that label. Plug the other, larger end of the cable into the 50-pin jack on the back of the scanner. Also included with the scanner’s accessories is a terminator plug, a small, flat box with a plug at one end and a jack at the other. Plug it into the 25-pin jack on the back of the scanner. And don’t forget to plug the scanner into a wall outlet. Turn the machine on.
Step 3: Install the Software.
All the necessary programs and drivers are on a single disk; insert it in your A: drive, choose Run from the Program Manager’s File menu, and type A:SETUP. You need only make a couple of choices and confirmations. Choose ScanJet IIcx from the Scanner Selection menu, confirm the installation settings, and wait as a slew of files are copied to your hard disk. Setup makes changes to your DOS and Windows startup files, but saves copies of any files that are changed. Restart Windows when the installation is finished.
Step 4: Test for Scanner Presence.
Open the HP DeskScan II program group and double-click Scanner Test. The first selection lets you make sure that all the hardware is functioning correctly. If you don’t pass the test, make sure that the scanner is plugged in to both the computer and an AC outlet, make sure that the terminator is in place, and (this was my mistake) make sure the scanner’s power switch is turned on. Close the test window and start the DeskScan software.
Step 5: Scan a Photograph, Step One: Preview
Raise the scanner cover and place a photograph on the glass plate, positioning it so that it’s aligned against the top right corner. This is just like aligning a page on a photocopy machine, and the ScanJet even has a positioning guide at the edges of the glass. Replace the cover. If you’re copying from a book or magazine, the cover should still accommodate the thickness of the original. Don’t lean on it. Back at your computer, click the Preview button. The scanner will make a quick pass over your photo, then show you the result. Be sure that the Type selection matches the photo--it thought mine was black and white, and I had to set it to “Sharp Millions of Colors” using the pull-down menu.
Step 6: Scan a Photograph, Step Two: Final
Crop the image using the box that’s already on the preview screen. You can drag or resize it by positioning the mouse cursor over its center or edges. Click the Final button and enter a filename; when you OK the name, the scanner makes a slower pass and saves the info to disk as it goes. Only the area you placed in the cropping box is saved.
Everything You Need for This Project
Hewlett-Packard ScanJet IIcx
IBM-compatible computer running Windows 3.0 or higher
An available half-slot
Philips-head screwdriver
Photograph to scan
Do’s
Clear a flat, even surface for the scanner.
Don’ts
Don’t put the scanner in direct sunlight.
Don’t scan and distribute copyrighted material.
Product Information:
ScanJet IIcx
Hewlett-Packard Company
PO Box MS511L-SJ
Santa Clara, CA 95051-8059
1-800-722-6538
Price: $1179
– Computer Life, May 1995


No comments:
Post a Comment